Introduction
Those new to version control get befuddled by some terms; it gets worse when one encounters terms such as working directory in Git, staging area Git, and Git local repository. Once considered carefully, putting them together makes it much easier to use Git, which becomes a powerful tool and quite an intuitive one at that.
Hereby, the Git workflow would be stated as simply as possible. Every fundamental concept will be illustrated using real example-case scenarios so as to make it possible to grasp how the functioning of Git occurs stepwise — even if you are someone just beginning.
Why Learn the Git Workflow?
Learning the Git Workflow is about preventing lost work, keeping track of progress, and collaborating more effectively with other people in teams. Whether one is independent, volunteering to help an open-source project, or part of a dev team, git basics will always start with learning how Git stages and stores code changes.
Once mind clears the explanation of Git workflow, managing version history becomes second nature.
The 3 Key Areas of Git Workflow
The Git workflow happens in three major local phases:
- Working Directory in Git
- Staging Area Git (that is the index)
- Git Local Repository
Let’s break down each one.
1. Working Directory in Git
There is a working directory in Git, which is basically a location where all the actual changes to the code will take place. It will have all the contents – new, modified – up to deletions at a time when a decision to move it into staging is made.
It includes:
- Untracked files
- Modified files
- New files pending for versioning
Example:
You edit style.css. Until you use git add, this change remains in your working directory in Git.
2. Staging Area Git
Like a waiting room, the Staging area in Git is for temporarily retaining certain changes before committing them to history.
Why it matters:
- Stage specific files (or just even lines!)
- Helped in eliminating unwanted or mistaken imports from being committed.
- And the ability to control the contents of each commit.
Command to stage a file:
git add index.js
And if you want to brush up on the basics of git for beginners, remember:
“Edit → Stage → Commit” is the fundamental Git flow.
3. Git Local Repository
Once staged, the changes would enter the Git local repository once committed.
This is where Git permanently records:
- – Complete commit history
- – Branches as well as snapshots
- – Times tracked contributions
Commit command:
git commit -m “Added login feature”You can then push these commits to GitHub or another remote repo — but they already exist in your Git local repository.
Practical Example: How Git Works Step by Step
Let us describe stepwise Git workflow along with some real commands.
Step 1: Check Git Status
git status
It shows which files are modified or untracked: that is the working directory in Git.
Step 2: Add to Staging
git add app.js
This puts it in the staging area of Git. You can now commit it without affecting other files.
Step 3: Commit to Local Repository
git commit -m “Add app.js with main route”
The change is saved in your Git local repository..
Step 4 (Optional): Push to Remote
git push origin main
Your local commits now sync to GitHub (remote).
You have thereby gone through a process that describes how Git works by following the steps from coding to saving to sharing.
Git Workflow Visual Summary
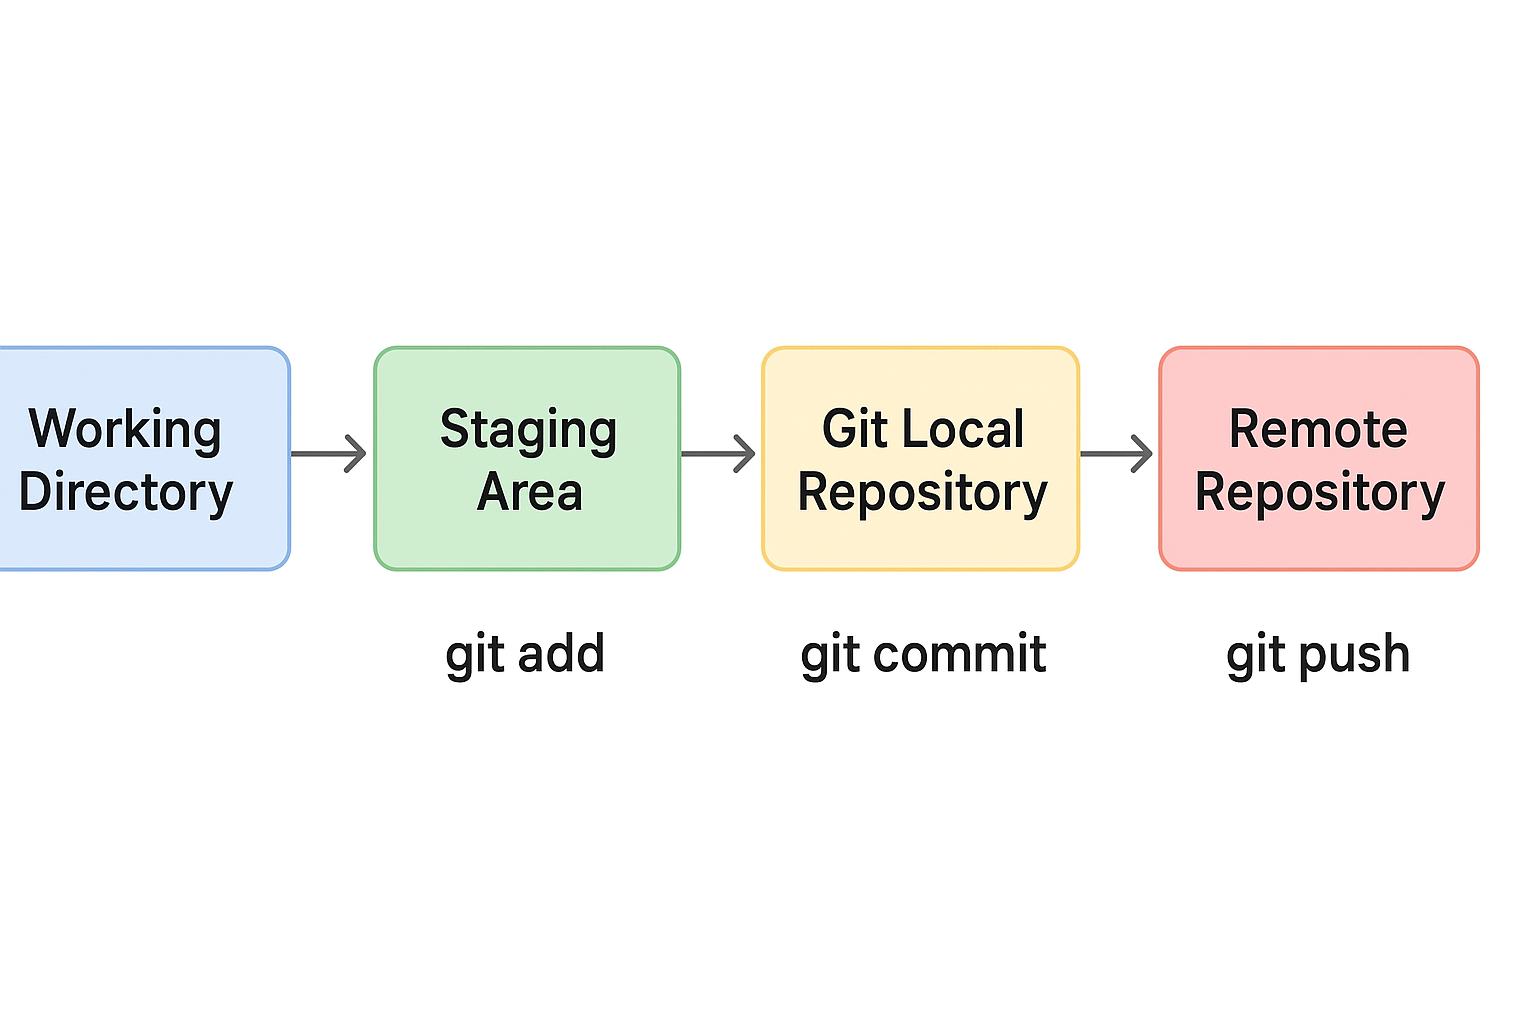
[Working Directory in Git] –(git add)–> [Staging Area Git] –(git commit)–> [Git Local Repository] –(git push)–> [Remote Repository]
This structure comes to the kernel of understanding the Git workflow explained lucidly.

Essential Git Commands to Practice
| Action | Command |
| View current status | git status |
| Stage a file | git add filename |
| Commit staged changes | git commit -m “message” |
| Remove from staging | git reset HEAD filename |
| View commit history | git log |
| Discard file changes | git checkout — filename |
If you’re still learning Git basics for beginners, keep this command list handy!
Pro Tips for Beginners
- Use Git add-p to selectively stage lines inside files.
- Make commits that are frequent and of clear message.
- Learn how to use .gitignore from day one to keep things tidy.
- Learn the internals of Git before trying the advanced features like branching.
Conclusion
You have now been walked through the Git workflow with direct mapping to your real-world coding routine. The three main stages — working directory in Git, staging area Git, and git local repository — constitute the building blocks of version control.
They are very essential to:
- Collaborating with a team
- Managing a solo project
- Contributing to open source
- Avoiding critical mistakes
Once you have grasped Git basics for beginners, you will move on to branching, merging, resolving conflicts, and knowing more!


